Featured Post 1 Title

Replace these every slide sentences with your featured post descriptions.Go to Blogger edit html and find these sentences.Now replace these with your own descriptions.This theme is Bloggerized by Lasantha - Premiumbloggertemplates.com.Download more free blogger templates from www.premiumbloggertemplates.com.

Read More

Featured Post 2 Title

Replace these every slide sentences with your featured post descriptions.Go to Blogger edit html and find these sentences.Now replace these with your own descriptions.This theme is Bloggerized by Lasantha - Premiumbloggertemplates.com.Download more free blogger templates from www.premiumbloggertemplates.com.

Read More

Featured Post 3 Title

Replace these every slide sentences with your featured post descriptions.Go to Blogger edit html and find these sentences.Now replace these with your own descriptions.This theme is Bloggerized by Lasantha - Premiumbloggertemplates.com.Download more free blogger templates from www.premiumbloggertemplates.com.

Read More

Featured Post 4 Title

Replace these every slide sentences with your featured post descriptions.Go to Blogger edit html and find these sentences.Now replace these with your own descriptions.This theme is Bloggerized by Lasantha - Premiumbloggertemplates.com.Download more free blogger templates from www.premiumbloggertemplates.com.

Read More

Featured Post 5 Title

Replace these every slide sentences with your featured post descriptions.Go to Blogger edit html and find these sentences.Now replace these with your own descriptions.This theme is Bloggerized by Lasantha - Premiumbloggertemplates.com.Download more free blogger templates from www.premiumbloggertemplates.com.

Read More
Showing posts with label flash tutorial. Show all posts

July 11, 2010

Create Bouncing Ball Using 2 Actionscript with Flash

This time I will teaching you to make bounce ball, i got this tutorial from my favorite Computer Tabloid. To make it, this time we will using ActionScript 3.0, that usually I using ActionScript 2.0. We using 2 ActionScript, first Script for set the speed, random color. Second Script for set total click, total ball, etc.

watchbg


GETTING STARTED


Tutorial Ingredients

Minimum Programs: Adobe Flash Professional CS2 (This tutorial using Flash CS5)

Difficulty: Medium Light

Duration: 20 Minutes


Resources

2 ActionScript External File


1. Open your Flash.

2. Click File > New > Actionscript 3.0.

ActionScript 3.0

3. Before starting, save your file for first. And write any name for files.

Save as

4. In the Tool box, choose Oval tool. And set the size, this tutorial I set to 32 x 32 px.

Oval tool

Properties

5. Right click on the circle, and choose Convert To Symbol.

Convert to Symbol

Click Registration point to Center. Click Advanced, then checklist Export for ActionScript, and then on the Class box, type “Ball”. (See the pictures below).

Convert to Symbol Panel

6. On the Properties panel, Class box, type “BallBall”.

Publish panel

7. Now, we create the ActionScript external, we need 2 ActionScript, so click File > Menu and choose ActionScript File. Make 2 ActionScript.

General dialog

8. For first ActionScript, write this script:

Actionscript 1

package
{
import flash.display.MovieClip;
import flash.events.Event;
import flash.geom.ColorTransform;
import flash.geom.Rectangle;
public class Ball extends MovieClip
{
public var speedX:int = 10;
public var speedY:int = -10;
public function Ball()
{
addEventListener(Event.ENTER_FRAME, onEnterFrame);
var colorTransform:ColorTransform = new ColorTransform();
colorTransform.color = Math.random()*0xFFFFFF;
transform.colorTransform = colorTransform;
}
private function onEnterFrame(event:Event):void
{
x += speedX;
y += speedY;
var limit:Rectangle = getBounds(parent);
if (limit.left < -10 || limit.right > (stage.stageWidth + 10))
{
speedX *= -1;
}
if (limit.top < -10 || limit.bottom > (stage.stageHeight + 10))
{
speedY *= -1;
}
}
}
}

9. For second ActionScript, write this script:

Actionscript 2

package
{
import flash.display.MovieClip;
import flash.events.MouseEvent;
public class BallBall extends MovieClip
{
private var tot_ball:uint = 5;
private var tot_click:uint = 0;
public function BallBall()
{
stage.addEventListener(MouseEvent.MOUSE_DOWN, onStageClick);
}
private function onStageClick (pEvent:MouseEvent):void
{
if(tot_click > 4)
{
stage.removeEventListener(MouseEvent.MOUSE_DOWN, onStageClick);
}

for (var i:uint = 0; i < tot_ball; i++)
{
var ball:Ball = new Ball();
ball.x = pEvent.stageX;
ball.y = pEvent.stageY;
ball.speedX = (Math.random() * 30) - 15;
ball.speedY = (Math.random() * 30) - 15;
addChild(ball);
}

tot_click += 1;
}
}
}

10. If finish, click Control > Test Movies to see the result.

Test Movie menu

Should like this… (Click the Flash)


July 05, 2010

Tweening and Easing in Flash

Tweening and Easing in Flash

The interesting thing is if you create an animation, makes it very attractive to people interested in seeing. Another animation in flash, we can create an object from one point to another by means of moving the position of the object, which in turn will become an animated series. It is owned by the flash capabilities which many referred to it as the ability of the Motion Tweening, and the ability to add additional effects, such as acceleration movement called easing.

Creating Tweening and Easing is not difficult, you just need a flash code that you can use. We do not need the Tool Box, we need only eight or more photos that we set the size to match to other photo. Here I use a size 355 x 256 Width and Height, you can change it as you wish, but be sure to also change the size on the script code.

Watch The Videos

GETTING STARTED

Tutorial review:

Program: Adobe Flash Professional CS2 – CS4 (In this tutorial using Flash CS5)

Difficulty: Medium

Complete Time: 20 Minutes

Resource:

ActionScript File

1. Previously prepared eight photos or more of the size 256 x 355 (or other size), but remember, the extension must be the same photograph, that is with the format. Jpg or Png. Put it in a folder.

Image Folder

2. Open Adobe Flash Professional. Then select ActionScript 2.0.

ActionScript 2.0

3. Save the flash first in a single image folder that you have prepared earlier.

Save As

Save As Flash

Save flash

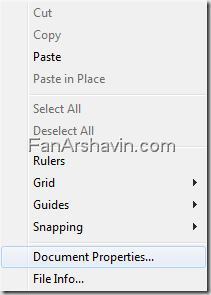
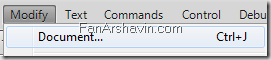
4. When finished, right click on the Stage, select Document Properties (or click Modify > Document).

Document Properties

Modify Document

5. In Document Settings tab, change the size according to desire (here I use a size 800 x 480 pixels).

Document Settings

6. When finished, right click on frame 1, then select Action.

Actions menu

7. In the Action dialog, enter the following script code:

Actions - Frame

import mx.transitions.Tween;
import mx.transitions.easing.*;

this.createEmptyMovieClip("box_mc", this.getNextHighestDepth());

with(box_mc)
{
beginFill(0xFFFFFF);
moveTo(0, 0);
lineTo(256, 0);
lineTo(256, 355);
lineTo(0, 256);
lineTo(0, 0);
endFill();
_y = 75;
filters = [new flash.filters.DropShadowFilter()];
loadMovie("image1.png");
}

var box_tween:Tween = new Tween(box_mc, "_x", Elastic.easeInOut, 50, 480, 3, true);
var i:Number = 1;

box_tween.onMotionFinished = function()
{
i += 1;
if(i >= 8)
{
i = 1;
}
box_tween.yoyo();
intervalId = setInterval(change, 1200);
}

function change()
{
box_mc.loadMovie("image"+i+".png");
clearInterval(intervalId);
}

8. To see the results, click Control > Test Movie.

Test Movie

9. And see the results.

Tweening and Easing

Source by: PC Mild Tabloid

June 02, 2010

Make a Fireworks Animation with Flash

This animation of the explosion particles (such as fireworks), which will have a group of particles moving randomly in all directions from a common point. This animation created by writing a function, which in these functions will make a MovieClip where each MovieClip (still using Drawing API of course) will be described shaped small particles.
image

See The Tutorial Video

1. Create a new Flash file with ActionScript 2.0 features:


File> New> Flash File (ActionScript 2.0)

image
2. First save of the flash FLA file which we will make it to a folder:
File> Save As ...


3. Right-click on the stage, and then select Document Properties menu or can also be accessed via the main menu:
Modify> Document ...

image
4. Change the background color to black, so animation explosion like fireworks at night.
image image
5. Right click on the first frame on the timeline, select the Actions menu to bring up the Actions panel that will write on the frame. If the Actions panel is available, straight to the next step.

image
6. After the Actions panel appears, it's time to write the script of the simulation points and this line:

image

function mover()
{
this._y += this.speed;
this._yscale += 10;
this.speed++;
if (this._y > 500)
{
this._y = 0;
this.speed = Math.random()*10;
this._yscale = 100;
}
}
function starField(x, y, n)
{
for (var i = 0; i < n; i++)
{
var star = this.createEmptyMovieClip('star'+i, i);
var dot = star.createEmptyMovieClip('dot',0);
star._rotation = Math.random()*360;
star._x = x;
star._y = y;
dot.lineStyle(0, 0xFFFFFF, 100);
dot.moveTo(0, 10);
dot.lineTo(0, 15);
dot.onEnterFrame = mover;
dot.speed = Math.random()*10;
}
}
starField(250, 200, 25);


7. To see a preview of the Flash movie we made, click the menu Control> Test Movie or by the keyboard shortcut Ctrl + Enter.

image
8. The result, we can see an animation of particles moving randomly in all directions from a common point.


9. If we look at the script, starField function () that we make will make an animation of particles generated by the position x, y, and the number of particles that we input the parameters. So to create more particles, we need to enter the input parameters to the function starField () which we call the script at the end of the line with a larger value so that the last line of this script can be changed into:

image

starField(250, 200, 100);


10. Perform Test Movie again.

image


11. Here we can see the difference that the number of particles that move more than that we created earlier.


12. We can create an explosion at a different position by entering the input parameters x and y position is different, then the last line of this script can be changed into:

image

starField(400, 300, 100);


13. Perform Test Movie again.

image
14. After the value of the parameter x and y changed, we can see that the explosion center to move into the right bottom.
15. Besides the position and number of particles, we can change the thickness of the lines by changing the thickness values in the first parameter in a function LineStyle () and change the color of the particles are made by changing the color hex value in the second parameter in a function LineStyle () which is in the function starField () that we make. Each color has a hex value of different, example 0xFFFFFF will produce a white color, while 0x000000 will produce a black color. To determine the value of a hex color, we can get through the Fill Color on the Tools panel.

image
16. So the script needs to be changed back to:

image


function mover()
{
this._y += this.speed;
this._yscale += 10;
this.speed++;
if (this._y > 500)
{
this._y = 0;
this.speed = Math.random()*10;
this._yscale = 100;
}
}
function starField(x, y, n, colorTotal)
{
for (var i = 0; i < n; i++)
{
var star = this.createEmptyMovieClip('star'+i, i);
var dot = star.createEmptyMovieClip('dot',0);
star._rotation = Math.random()*360;
star._x = x;
star._y = y;
if(i%colorTotal==0)
dot.lineStyle(2, 0xFF0000, 100);
else if(i%colorTotal==1)
dot.lineStyle(2, 0xFFFF00, 100);
else if(i%colorTotal==2)
dot.lineStyle(2, 0xFF00FF, 100);
else if(i%colorTotal==3)
dot.lineStyle(2, 0x00FFFF, 100);
else
dot.lineStyle(2, 0xFFFFFF, 100);
dot.moveTo(0, 10);
dot.lineTo(0, 15);
dot.onEnterFrame = mover;
dot.speed = Math.random()*10;
}
}
starField(250, 200, 100, 5);


17. Since the color value of the thickness of the line at LineStyle () all particle movieclip we change into a variety, then these particles will become more bold and colorful.

image


Who's The Owner ?

Yeah, we must respect the owner of Tutorial, if not there’s the Author, we never have a Greats Tutorial! FanArshavin.com so respect with the owner of Tutorial.

Tutorial and Video by: FanArshavin.com

Source: PC Mild Tabloid


Making Typewriter Effects with Flash

How it works is very simple typewriter, when one particular letter key is pressed to make a sculpted metal letters pressing the inked ribbon-shaped which causes the ink printed on paper. In order for a copy of the letter is printed on several layers of paper, while the use of carbon paper inserted between layers of paper.

image
Write a paragraph to the effect that writing comes a similar letter per letter typewriter can be prepared by using frame by frame, but by writing few lines of Actionscript it will be faster and easier.

SEE THE TUTORIAL VIDEOS


1. Create a new Flash file with Actionscript 2.0 features:

Flash File > New > Flash File (Actionscript 2.0).

image

image

2. By using the Line Tool, draw thin lines on the screen so that a background paper presented picture.


3. Selection of all the lines, how to click the menu:

Edit > Select All (or pressing Ctrl + A)
image

image

4. After that make it all into a group via the menu:

Modify > Group (or by pressing Ctrl + G).

image

5. Using the Text Tool, create a text object in the middle of the stage.

image

6. Click on the text object.

image

7. In the Properties panel, change the text type to Dynamic Text.

image

8. In the Variable column, give the variable with the name of "text".

image

9. Do not forget to reset the Line Type to Multiline, so that writing can take the form of a paragraph.

image

10. Set the font that most resembles a typewriter among many fonts are available on the computer (we take for example the font "Courier New", which owned most of the computer), to add effects such as typewriter.

11. Create a new layer above it as a special place to store the Actionscript to be more interesting:

Insert > Timeline > Layer

image

12. On this new layer, right click on the first frame, then select the Actions menu.

image

13. After the Actions panel appears, give the script:

image 

var i:Number = 1;
var text:String;
var textFull:String =
"Welcome To Fanarshavin.com learn about Graphic Design and get more

about Graphic Design and get freebies."

this.createEmptyMovieClip("typeWriter", this.getNextHighestDepth());

typeWriter.onEnterFrame = function()
{
    if (i < textFull.length)
    {
        text = textFull.substring(0, i);
        i++;
    }
    else
    {
        text = textFull;
        delete typeWriter.onEnterFrame
    }
}

14. Done up to here, to see a preview of the results, do a test movie from the menu Control > Test Movie (or by pressing Ctrl + Enter).

image

15. If no steps are missed, then we will find an animated writing letters to the effect that came out one by one.

 
16. To further give effect like a typewriter, we can add sound reads "click" like a typewriter with repetitive periods each letter appears.

image 
Done ...