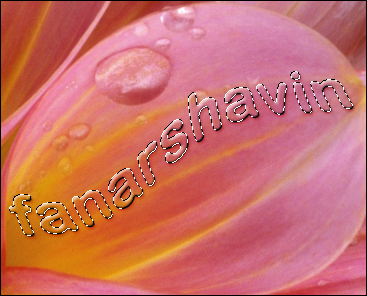
In this tutorial, I will show you to make Water Text on Images with Photoshop. This Text like dew on the leaves, so keep learn if you make mistakes, you can using any images, but you can using my images.
GETTING STARTED
Tutorial Review:
Minimum Program: All Adobe Photoshop CS Version (In this tutorial using Photoshop CS5)
Difficulty: Easy
Duration: 15 Minutes
Resources:
Flower Images (FanArshavin Stock Images)
1. Open your Photoshop.
2. Click File > Open and browse your images.
3. Click Type Tool (L), and write any text.
4. On the Layer panel, right click on the Text layer and choose Rasterize Type.
5. Next, click Filter > Distort > Wave.
And set the following settings below.
And should be like this…
Or you can rotate the text like this… (To rotate the text, click Edit > Transform > Rotate)
6. Right click on your text layer, and choose Blending Options.
And follow this settings below…
Then in the same window, click Bevel and Emboss, and follow this settings…
Again in the same window, click on the "drop shadow" button from the list of options to the left, and follow this settings…
7. Now, Hold CTRL button and click on your text layer to give you a clean selection.
If success, should be like this…
8. Now, click on your photo layer, and click Filter > Distort > Spherize.
When water is collected and held the image below is magnified slightly, this will help to reproduce this effect, and set Amount to 30 %.
9. When in the Photo Layer, click Image > Adjustment > Brightness/Contrast.
And set the following settings:
10. Hah… Finally you have this result…
Still not Understand ? Recommended to watch my videos…
Happy Poshi…


0 comments:
Post a Comment